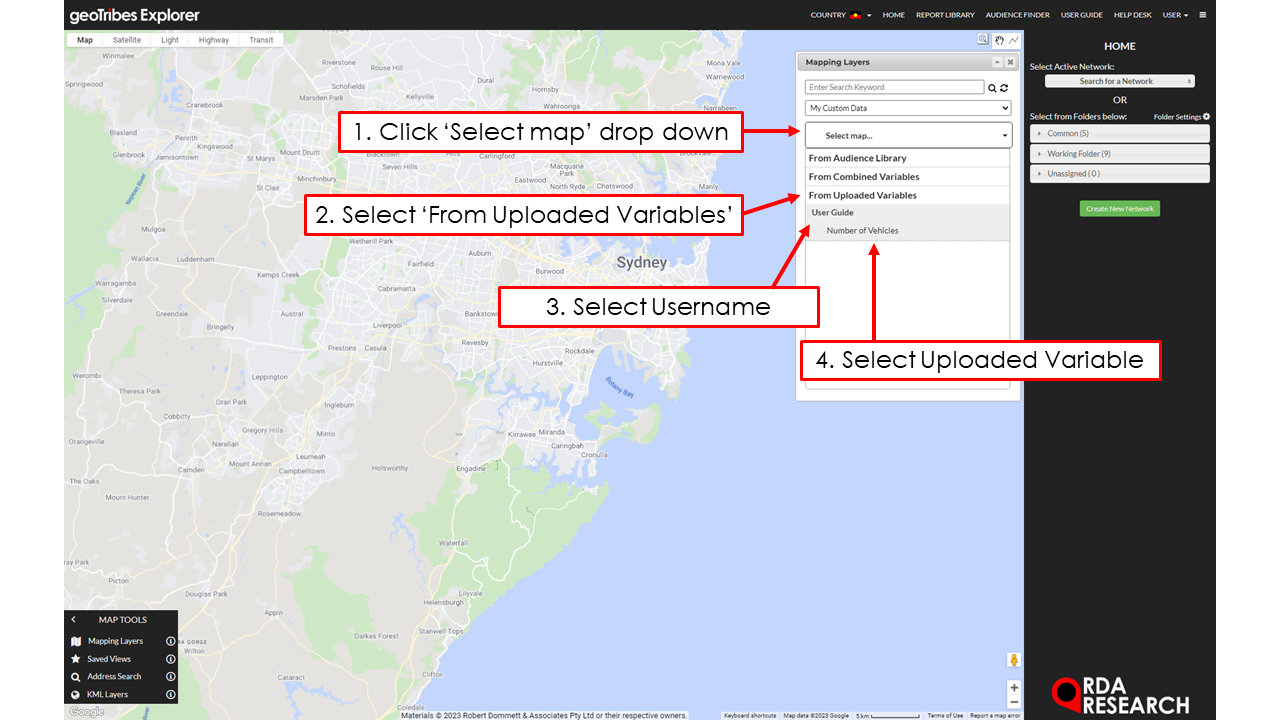
Mapping and Reporting Data: Uploaded Variables
This tool enables users to upload their own data into the system to use for mapping layers or reports. For example if customer/audience related data is recorded on a Census Area or postcode level, users could then visualise how this data maps over regions.
Create File for Upload
To prepare a file for upload, users should ensure its headers and file layout are structured as seen below:
Example Postcode upload format, users can also upload CEN (Census Area) format as described below.
"ISO" contains the Country version code, for Australia “AUS”, New Zealand “N18”, United States “USA”, United Kingdom “GBR”, Canada “CAN”
Area Codes can be either Census or Postcode with each requiring different notation:
"CEN" contains the Census Area codes and must match the Country version.
“Postcode” only available for Australia thus represents the four digit Postcodes.
Variable Code columns follow, and must only contain numbers or decimal points.
Upload and Define the Variable


After uploading the data users need to define a base variable which it can be benchmarked against. For example, users may wish to see the proportion of customer/audience by Total Persons 18+. If users don’t need a base variable and just need the raw data mapped users should include an additional variable which has a value of 1 for all rows.
Uploading the Variable
Select username drop down and select “My Uploaded Variables”.
Select “Upload” in the My Uploaded Variables pop up.
Choose file to upload (see above on how to format the file).
Click Upload.
Defining the Variable
Click username drop down and select “My Uploaded Variables”
Find the Uploaded Variable(s) that have been uploaded.
Select “Define” underneath the “Action” column, if a variable has already been defined it will display “Edit”.
Fill in the “Define Variable” layout:
“Name Variable” this will name the variable and how it will be displayed throughout the Explorer.
“Choose Data Type” this will format the variable pending on what it represents. For example sales data will use Dollar ($).
“Select Base Variable” out of the options on the right-handside options below “Base Variable”. In Australia, commonly used base variables can be found under “RDA Research” -> “Australian Base” -> “Summary Statistics”.
“Set Decimal Place” How many decimal places will be displayed.
“Share with Company” Will enable other users within the company to view the Uploaded Variable.
Click “Define”.
Edit and Delete Uploaded Variables
After uploading and defining a variable users may wish to edit/delete their Uploaded Variables. This can be done by going into username drop down and selecting “My Uploaded Variables”.
EDIT - In the pop up users can search for their Uploaded Variable of choice and select “Edit” below the “Action” column. Users can now modify their variable, see Step 4. above in “2. Define Variable” to read more about what each of the steps performs.
DELETE - Select the x icon below the “Action” column.

